-
To use your Fast Grade quiz (good for tests and quizzes
where you want to allow each kid to work at his own pace, and be on different
questions):
-
Click once on the lesson/quiz you want to use.
-
Click the big button that says ENGAGE LESSON.
-
At the next screen choose STUDENT MANAGED ASSESSMENT.
-
Check the box that says INCLUDE IN GRADEBOOK. (This can be
easily changed later.)
-
Use the drop-down next to SESSION, choose the category you
want this LESSON filed under. (This can easily be changed later.)
-
Use the drop-down next to CLASS to choose which class to
test.
-
Click START.
-
When the Clicker screen comes up, click START. When you engage
a Student Managed Assessment, the Student Feedback window appears.
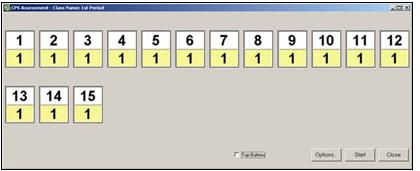
The class name appears in the title bar of the window.
The top row of each bank of numbers, preceded by a response
pad symbol, corresponds to the pad ID numbers assigned in the class. These
pad ID numbers are black on gray numbers before you start the assessment.
The Student Managed Assessment mode is capable of supporting
up to 2000 pad IDs.
The bottom row of each bank of numbers, represents question
numbers. These numbers increment as each student proceeds through the list.
Click to change any of the session delivery options.
Click to initiate the session. Upon doing this,
students can begin submitting answers.
To end the session, click End. Confirm ending the session
by clicking Yes from the confirmation window that appears.
NOTE: Remember, if your students use IR pads, they can
use the F button on their response pad to scroll through the questions,
using any button to stop when they get to a question number they want to
answer. They can also use the G button to move backward in the list of
questions or the H button to forward.
-
To use a TEACHER MANAGED ASSESSMENT:
-
Click once on the lesson/quiz you want to use.
-
Click the big button that says ENGAGE LESSON.
-
At the next screen choose TEACHER MANAGED ASSESSMENT.
-
Check the box that says INCLUDE IN GRADEBOOK. (This can be
easily changed later.)
-
Use the drop-down next to SESSION, choose the category you
want this LESSON filed under. (This can easily be changed later.)
-
Use the drop-down next to CLASS to choose which class to
test.
-
Click START.

-
Before you begin, click the OPTIONS button.
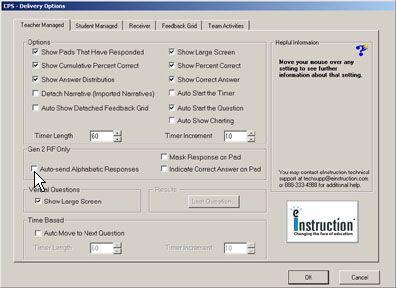
-
This is where you set the time for each question, and set
it to show the number of students who chose each answer, whether you want
it to move to the next question automatically, and whether to show the
correct answer after. Click OK.
-
To start the lesson, click the NEXT button.
-
The timer will begin counting down, and the grid will show
a blue square for each student who has responded. If you want to give them
more time, click the + button.

-
When the time is up, it will display the results; how many
chose each answer, and which is the correct one, as well as the cumulative
percent correct.